
Free Everglades Explorer Course (K-8)
- Surf Skate Science

- Feb 5, 2022
- 1 min read
Updated: Mar 6, 2023
Lessons are available for grade K-8 and can be done at your own pace. Share photos of you doing the lessons by email to info@surfskatescience.com or tag us on social media to be entered to win a prize each month. Let's get started! (Click on arrows by each lesson to expand the content.)

Week 1 Lesson - Cypress Dome
Welcome to the Everglades. We will start by exploring this amazing resource. Follow along with Richard Kern from Odyssey Earth as he explores different habitats of the Everglades using a drone with a 360-degree camera.
Explore the 360-degree videos on habitats such as the Cypress Dome, Mangrove Swamp, Sawgrass Prairie, Seagrass Meadow, and more! Use your cursor to scroll up, down, and all around to view the habitats. You can use your computer, a smart phone, cardboard VR or VR Goggles to view. Local Students can "borrow" our VR glasses (limited quantity available - email info@surfskatescience.com) Each video comes with a field guide and scavenger hunt questions created by Odyssey Earth. You will use the Field Observation Datesheets to complete a digital field study of the habitats. This week we will explore the Cypress Dome. The cypress dome habitat is one of the most mysterious, fascinating and important habitats in the Everglades. If you’re up for some adventure and don’t mind getting a little muddy, a trip into a cypress dome is an experience you’ll never forget! First, download your 1st field guide here:
https://odysseyearth.org/wp-content/uploads/2022/07/Cypress-Dome-field-guide.pdf
Then, watch the first video here: https://www.odysseyearth.com/videos/cypress-dome-360/ Finish the field guide and take a screen shot of your online quiz. Email these back to info@surfskatescience.com for credit toward your explorer certificate and for you chance to win a monthly prize.
Week 2 Lesson - Mangrove Fringe
Welcome to Week 2 of our Everglades Explorer class. This week we are exploring the mangrove fringe. Grab some google cardboard VR google and explore this habitat in 360 degrees here: https://www.odysseyearth.com/videos/mangrove-fringe-360/ If you look at South Florida from above, the coast is fringed with…houses and hotels. But go back in time and you would have seen dense forests of mangroves. The coastal Everglades is still loaded with mangroves, which is a really good thing. Watch the video, use the field guide (click the button below) and take the quiz to identify three things you might encounter in an Everglades cypress dome. Good luck!
Send us a photo of you exploring a local mangrove habitat and learning about mangrove through this lesson to be entered in our February giveaway. Vocabulary List
Mangal: a community or forest of mangrove trees
Lenticel: a pore-like structure found on vascular plants that is designed to absorb oxygen and for the exchange of other gases
Pneumatophore: specialized aerial roots that enable certain plants to breathe air in waterlogged habitats, similar to a snorkel. Black mangroves have pneumatophores, and cypress knees are also considered pneumatophores. The surface of these pneumatophores are covered with lenticels
Exclusion: keeping apart; blocking an entrance
Aerial roots - Short roots above ground.
Brackish water - Fresh water mixed with saltwater
Drop roots - Roots that hang down from the branches of the upper stem.
Ecosystem services - Natural services that support life on earth and are essential to the quality of human life and to the functioning of the world’s economy.
Facultative halophytes - Plants that can live in either fresh or salty water.
Mangroves - A term for a variety of tree species and a habitat associated with brackish water. There are three main types of mangroves: red, black, and white. Mangroves provide a primary line of defense against hurricanes. LAB SUPPLIES:
2 Shallow Trays
Sand
Water
Red, Black & White Pipe Cleaners
Straw
Rule
Scissors
Mangroves are one of the most highly adapted species in the Everglades watershed. They have evolved a specialized root system and physiological mechanisms that ideally suit them to their specialized niche as the interface between land and sea along the coastline. This lesson on mangroves is a perfect vehicle for characterizing how biotic components can define an ecosystem. There are three species of true mangroves that live in Florida: red, black, and white. A fourth tree – the buttonwood, is closely related to the white mangrove and is sometimes considered a mangrove, but is intolerant of flooding, and is not limited to coastal mangrove swamps. The red mangrove’s shallow prop roots extend from the lower stem like arching spider legs, giving it the nickname “the walking tree.” Drop roots hang down from the branches of the upper stem. The parts of the roots that are above ground (and above water) contain small pores or lenticels that allow the roots to take in oxygen, which then moves down through the tissue and prevents water and salt from entering during high tide. The waxy, dark green leaves of the red mangrove are larger than those of the other mangrove species, and help the tree retain water. The red mangrove gets its name from the reddish layer just beneath its thin grayish bark. Its seedling, or propagule, is long and cigar shaped. The red mangrove grows closest to the coast and is even found in off-shore mud flats, and sand bars.
The black mangrove is typically found more inland. Its root system consists of shallow cables that radiate outward many feet away from the stem. Peg-like aerial roots called pneumatophores extend upwards from the cable roots. These pneumatophores contain lenticels that help in oxygen exchange. The black mangrove gets its name from the dark, blackish bark. The leaves have a silvery underside and are able to excrete salt. Its propagule looks like a lima bean. The white mangrove is found even further inland and its root system is able to exclude salt by filtering brackish water, freshwater mixed with saltwater. It is the smallest of the true mangroves and has oval shaped leaves with a distinct gland-like opening on the leaf stem, called a petiole. White mangroves also have pneumatophores like the black mangrove. Mangroves serve important ecosystem services in coastal communities, by helping protect the fragile coastline from erosion during storm surge. Mangroves also contribute to the growth of new land by trapping organic debris in their root system. They shed part of their leaves throughout the year, adding to that buildup. Preparation: 1. Gather materials.
2. Cut pipe cleaners in half (6 inch lengths).
3. Build sample model to show class (optional), or draw a sketch on the board of where to place the mangroves in the model (see diagram of mangrove models).
4. Have materials for each group’s station in place: sand, water in beakers, pipe cleaners, trays, and ruler. Directions:
You are going to construct two models to demonstrate the role mangroves play in the coastal community. One model will include mangroves, the other will not.
In each tray, students will: create a shoreline by placing a 3 to 4 inch pile of sand at one end of the tray. On one of the models, use the colored pipe-cleaners to simulate the three kinds of mangroves. Securely insert the pipe-cleaners into the sand. For red mangroves: twist together 4 sections of red pipe-cleaners at their mid-point to form the trunk and spread the ends apart to form prop roots. Add a coastal fringe of 3 red mangroves along the coast- line from side to side of the tray by interlocking the simulated prop roots and pushing them down into the sand. For black mangroves: twist 4 black pipe cleaners together but spread the simulated roots apart and flatten them like spokes of a wheel. Use one “spoke” to anchor the mangrove in the sand. Add pneumatophores by twisting the ends of the pipe cleaner so that they project upwards. Place the black mangroves in a band behind the red mangroves so that the pneumatophores stick up above the surface. Make 3 black mangroves. For white mangroves: twist 4 white pipe cleaners together. Spread the “roots” and stick them straight through the sand behind the black mangroves. Make 3 white mangroves.
Add more sand to cover the base of the mangrove root systems in the model. Add water to the model to a depth of about one third of the tray. For the mangrove model, make sure the water covers the lower part of the prop roots of the red mangrove and covers all the roots of the black mangroves so that only the pneumatophores project above the water.
Add the same amount of water to the model with no mangroves.
With a ruler, measure the depth of the sand just above the water line in each model. Create a data table and record this measurement. If students are not using science journals, have them create a data table on a piece of paper.
Use a ruler to simulate waves by placing it in the water end of the tray and moving it gently back and forward for 30 waves. Push it strongly towards the "beach" to simulate storm surge about 5 times. Repeat this procedure in the model with no mangroves.
Observe the results. In the same spot that you measured initially, take the measurement again of the depth of the sand. Repeat this procedure in the model with no mangroves. Record your results on your data table. Observe the amount of sand that has spilled into the water in each model.
Share your results with us by emailing your graph and photos to info@surfskatescience.com. How do mangroves help protect our coastlines and our local wildlife? This week’s field trip opportunities:
Explore a local park with mangroves and try to identify the different species. Here are some parks we recommend but you can find mangroves at many parks that line the intracoastal waterways.
Deerfield Island Park
Anne Kolb Nature Center
Holland Park
West Lake Park
Secret Wood Nature Center
Mizell Johnson State Park
Oleta Rive State Park
Bill Baggs Cape Florida State Par
Week 3 Lesson - River of Grass
Ever wonder how the Everglades came to be known as the “river of grass?” Explore the amazing world of the sawgrass prairie with us and you’ll get it.
Watch the video, here: https://www.odysseyearth.com/videos/sawgrass-prairie-360/
Then use the field guide and take the quiz to identify three things you might encounter in an Everglades sawgrass prairie.
Vocabulary:
• Ecosystem services - Natural services that support life on earth and are essential to the quality of human life and to the functioning of the world’s economy.
• Hydric - An area saturated by water.
• Metaphor - A word or phrase that represents a concept or idea through another concept or idea.
• Wetland - An area of land that is wet at least part of the year, often containing unique soils, vegetation, and wildlife; sometimes referred to as swamps, bogs, marshes, or prairies.
Download this week's lab below:
(If file does not download, click this link)
For field trip options, see Lesson 2. Send us a photo of your lab to be entered into the giveaway.
Week 4 Lesson - Seagrass Beds
Seagrasses don’t get enough love, but they’re really, really, super important. Follow us on a 360 tour of a typical seagrass meadow to find out why.
Watch the video, use the field guide (click the button below) and take the quiz to identify three things you might encounter in an Everglades seagrass meadow.

Watch the video, here:
https://www.odysseyearth.com/videos/seagrass-meadow-360/
Then use the field guide and take the quiz to identify three things you might encounter in an Everglades seagrass meadow.
Download the field Guide here
Then finish and complete the Field Data sheet. Download below. If you are unable to download, go to this link.
Seagrass live in the coastal waters of most of the worlds’ continents. They are the main diet of manatee and sea turtles. Sea turtles, manatees, parrotfish, surgeonfish, sea urchins and pinfish feed on Florida seagrasses. Many other smaller animals feed on the epiphytes and invertebrates that live on and among seagrass blades.
Seagrasses absorb nutrients from coastal run-off and stabilize sediment, helping to keep the water clear.
In order for seagrass to grow, the water must have a critical balance of temperature, salinity, waves, currents, depth, substrate and sunlight. If the balance is thrown off, the seagrass habitat can die.
Seagrasses are one of Biscayne Bay's critical habitats. Seagrass beds serve as a food source, a habitat for small marine organisms, and they regulate water quality by stabilizing sediments and cycling nutrients. However, seagrass cover in the Bay has drastically declined over the last decade.
Seagrass coverage over the last 10 years:
Seagrass coverage has significantly declined in Biscayne Bay over the last 10-20 years. The most notable area in Biscayne Bay experiencing this decline is near the Julia Tuttle Causeway. Seagrass coverage decreased by nearly 90% in some areas around the Causeway. The problem with seagrass decline is that once it's removed from the ecosystem, it's very hard to restore and recover.

Google Satellite images of seagrass coverage, represented in darker shading, near Julia Tuttle Causeway in 2011 (pictured left), contrasted with coverage in 2016.
High volumes of nutrients from leaky septic systems and sewage spills (SSOs) as well as fertilizer runoff are a few of the contributing factors causing the decline in seagrass coverage. As an estuary, Biscayne Bay requires both fresh and saltwater to support its diverse ecosystem. While the Bay receives freshwater through the region's intricate canal system, the quality of that freshwater can be poor. This poor water quality is having measurable impacts on the Bay and is likely contributing to the localized seagrass die-offs we are seeing in the Bay.
Interested in learning more about how you can improve local water quality? Read more HERE.
Download Science Lab Activity
In today, lab you will map out the many everglades habitats we have explored. Access the lab here: https://www.evergladesliteracy.org/_files/ugd/8d5061_c2469a62b695441da28df555b3d6116e.pdf
Field Trip Option:
Seagrass can be found all over Florida. Most is located in our waterways and bays. A kayak or paddleboard adventure can be a great way to explore some of these habitats. Access this map for a close up look of seagrass beds in our area.
A trip to Biscayne Park is a great opportunity as well. Biscayne National Park It is as big as Austin, Texas, and a full 95 percent is underwater, with reefs, wrecks, seagrass meadows and marine life ranging from manatees and dolphins to loggerhead turtles and lionfish. There are fields of fan coral, brain coral, sea anemones and sponge. And they’re all in water that averages about 10 feet deep. You’ll need a boat to get to them, but at least
Week 5 Lesson - Florida’s Aquifers and Springs
Florida’s Aquifers and Springs Ready to learn more about Florida’s aquifers and springs? Watch this video to explore these environments and learn how important they are for our drinking water.
How many times have you popped open a plastic bottle of spring water and wondered where it came from? Probably not that often. But chances are that crystal clear water came gurgling out of Florida’s incredible, massive spring system. If you don’t believe me, check it out for yourself!
Watch this video, do the online test them complete the worksheet below http://www.odysseyearth.com/videos/floridas-aquifers-and-springs/
Worksheet Download: https://2feeae1a-1cd0-41cf-a9c1-cce331bd4e47.usrfiles.com/ugd/2feeae_16c02cfc04444a8b9b380ca473253e8d.pdf
Field Trip Options:
Visit one of the amazing Florida springs. We love paddling in Weeki Wachee, hearing the history of Crystal springs and Rainbow springs is simply magical. Nearly 900 springs bubble to the surface in Florida. You can swim, snorkel, paddle, boat and even scuba. Take a road trip to the West coast, central or Northern Florida and share your adventure with us!
Week 6 Lesson - Where Does Our Water Come From?
WHERE DOES OUR WATER COME FROM? Watch this video: https://youtu.be/W_qRoqGXldE
Natural resources are derived either from the air, soil, water, and organisms of the biosphere, or from the subterranean areas of the Earth. Resources of the first type come from more usual parts of ecosystems, and are labelled ‘renewable’, and include things like wind power and trees. Resources of the second type are labelled ‘non-renewable’, for example the fossil fuels coal, oil and gas. Current unsustainable rates of human growth and consumption are threatening to use up all the non-renewable resources, and pollute much of what is renewable.
How do we manage resources that seem to belong to everyone? Natural food reserves, energy resources like fossil fuels, a clean environment, with clean air, water and soil belong to everyone and yet are protected by no one. Today, protecting such common-pool resources has become a challenge, not only on the local scale but on national and global ones as well.
Watch Now: Why is Water So Crucial to Body Function?
The River of Grass provides the drinking water for South Florida. Altogether, the Everglades ecosystem supplies the drinking water for eight million Floridians. That’s one out of every three people living in the state. In South Florida, much of the water we drink comes straight from the Biscayne Aquifer, an underground river replenished by the flow of water through the Everglades. The wetlands act like filtration systems, removing impurities from the water that moves slowly through them.
Coastal aquifers are at risk from saltwater intrusion. South Florida’s aquifer is made of limestone, which is highly porous and permeable rock. Limestone contains tiny holes that allow water to move through it, like the holes in a sponge.
The wetlands of the Everglades store excess water during the rainy season. When the dry season sets in, excess water seeps through Florida’s porous aquifer, acting as an underground river recharging the water supply. Florida cities tap into this underground water source for use in homes and businesses. Problems occur when water is used at higher rate than it can be replenished.
At the coast, the freshwater in the aquifer meets the saltwater of the ocean. The pressure of freshwater within an aquifer serves as a barrier to that ocean water. But, when there is less freshwater in the aquifer and there are higher sea levels, saltwater can start creeping in. If the saltwater advances to the wells we use to draw up drinking
water, those wells can’t be used anymore.
South Florida’s projected population growth will further increase demand on our aquifers and rising seas levels will exacerbate saltwater intrusion. Getting more freshwater into the Everglades helps fight saltwater intrusion and recharge our aquifers.
Water is the most critical issue facing the Everglades. It enters the system directly in the form of rainfall, or indirectly by flowing down from the north. Historically, the rain that fell within the Kissimmee River Basin eventually made its way south into Lake Okeechobee and then the Everglades. Today, much of the water is diverted for other uses before it reaches the southern Everglades; hence, little is available to evaporate back into the atmosphere. The quality, timing (when the system receives the water), and distribution of the water are as important as the quantity of water the area receives.
Then have a parent help you complete this worksheet: http://sitesmedia.s3.amazonaws.com/creekconnections/files/2014/12/Water-Availability-Table.pdf
Our planet is covered with water (71%), but the availability of water is the main limiting factor for life on Earth. The Water Availability Tablesummarizes the major factors affecting the amount of available water on Earth. There are about 2.18 million gallons of clean, freshwater available per person on Earth, equaling only about 0.0003% of the total water on Earth. With the known supply of freshwater on Earth, availability per person is not evenly distributed. Factors such as politics, geography, climate, and weather affect the availability and distribution of water. Land and water use for agriculture, industry, and homes affect the quality and quantity of available freshwater. These uses can have cumulative effects on soils, watersheds, and wetlands and can hinder their ability to hold and filter water.
How are people trying to fix it?
The ongoing Comprehensive Everglades Restoration Plan (CERP) aims to recreate the original north-to-south flow of water. Water that is now sent out to sea will be cleaned and rerouted south once again in the right quantities and at the right time. The wetlands will receive the water they need and our drinking water supply will be replenished. CERP is funded by the federal government and the state government of Florida. As one of the largest ecosystem restoration projects in the world, CERP is an ambitious project to protect Florida’s ecology,
Because of changes in water flow, the Everglades doesn’t receive the fresh water that it needs. Plants and wildlife depend on that water, and so do we. communities, and economy.
What can we do? Here are 3 options to consider:
Refrain from using the resource - preservation. During time of less rain, cities may make restrictions on our water use. This could include restrictions where we can only use water at certain times or days.
Use the resource, but fix it afterwards - remediation/restoration. For example, building a desalinization plant to create fresh water from salt water.
Use the resource wisely and ecologically - sustainable-use strategies. These would include conservation measures and public awareness campaigns to encourage sustainable practices
Which do you think is our best option? What are the ways YOU use water? Make a list.
Do you know where your water comes from? Rainwater seeps into the aquifer and then is drawn through wells into pipes that run to our homes and businesses. Draw a picture of how water gets to your home.
Choose one of the two labs below:
LAB 1 - Why must we use water wisely?
Scientists often use models to recreate specific scenarios in a simplified way. In this activity they will use a model to
better understand water usage.
Materials:
Brown Paper Bag with 16 beads or other small items (even candy) inside
Student Worksheet
Paper
Pencil
Water Use Handout: Saving the Everglades = Protecting Our Water Supply (optional)
Procedure:
Do this project as a family at dinner. You will need more than one person.
ROUND 1
Tell the student(s) and family members: “Each one of you represents the head of a family. In order for your family to survive, you must grow enough food for them to eat. The only water source to grow your crops is a small local lake (represented by the bag). Once a year you will get a chance to pump water and irrigate your crops to feed your family. The more water you have, the more crops you can grow. Without talking or looking in the bag, reach in and take ‘water units’ from the lake. Pass around the bag until everyone in your group has had a turn. It is your choice how many units you take. However, if you only take one or none, your crops will fail and your family will starve. Keep the water that you ‘pump’ in front of you.”
Pass the “lake” around the table. On the worksheet, have the student record the number of “water units” that are left in the bag (round 1).
ROUND 2
Tell student(s) and family members: “Growing crops is not a one shot deal – there is always next year! At the end of each year the rainy season starts and the lake can recharge (replenish). This year has been an especially wet rainy season so put all of your beads back into the bag. During this round, you may communicate with your group. Pass around the bag until everyone in your group has had a turn. It is your choice how many units you take. However, if you only take one or none, your crops will fail and your family will starve. Keep the water that you ‘pump’ in front of you.”
After the family member each have taken their water from the lake, record the number of water units that are left in the bag (round 2).
ROUND 3
Tell student(s) and family members: “We are going to play round 3. In this round, it is a normal rainy season so you are going to double the amount of water that is left in the lake after round 2. For example, if you have 6 beads in the lake, add 6 beads more to the bag. However, the carry-ing capacity of your lake is only 16 ‘water units.’ That is the amount your lake will hold. When you are doubling your water units you may not put more than 16 units in the bag, even if you have more than 8water units left. Pass around the bag until everyone in your group has had a turn. It is your choice how many units you take. However, if you only take one or none, your crops will fail and your family will starve. Keep the water that you ‘pump’ in front of you.”
After the family member each have taken their water from the lake, record the number of water units that are left in the bag (round 3).
Subsequent Rounds - Give students time to play several more rounds. Tell the student(s) and family members: “Play the game again, and keep playing (doubling the units left at the end of each round with a maximum of 16 units). Record the number of ‘water units’ that are left in the bag after each round. Play several more rounds until you see a pattern emerging.”
Did you notice that the sustainable harvest of water each year is 8 units or 2 beads/student? Read the information at Sustainable Environment and answer the questions on the worksheet as a family.
Answer these questions:
1. Describe how this activity modeled water usage and the ways in which models can help us make predictions. This activity used a specific number of beads to represent water in a community, the bag represented the lake, and the various rounds represented different water use scenarios. This activity is a simple way to predict what will happen to our water resources under various scenarios. Water is a common resource, but not an inexhaustible one. In order for everyone to have equal access to water we must conserve use and not use more than our fair share.
2. Think about water use on a global scale. Is this resource being used wisely? Why or why not? Does everyone have
equal access to water in a fair and equitable manner? Why or why not?
3. What can people do to use these resources more wisely?
Lab 2 - How can we make fresh water out of salt water?
The earth’s plants, animals, and people depend on fresh water to survive. But the water on our planet is almost all saltwater! That’s why it’s so important that we protect all the freshwater we have. With more and more people on the planet, and more and more water being used, in some parts of the world freshwater is already hard to come by.
Oceans as well as some lakes and ponds contain salt water, which isn't very good to drink. So how do people living near salty water bodies find drinking water? Join us and learn how to make a tool to desalinate water (remove salt from water) and make it drinkable!
In countries such as Saudi Arabia and Kuwait––which are extremely dry and surrounded by saltwater–– a process called “desalination” is used to remove salt from water and make it drinkable. Some cities in America desalinate water too. Two examples are Santa Barbara, California and Tampa Bay, Florida.
The earth naturally desalinates water! Water is constantly evaporating from the ocean, turning into clouds, and falling on the earth as fresh rainwater. It’s just one part of the water cycle, which constantly recycles the planet’s water supply.
Do you want to try naturally desalinating your own water? With the following experiment, you can make your own water cycle!
Here’s what you’ll need:
Salt
Plastic Wrap
Water Source
A mid-sized bowl
A container that fits inside bowl
Table spoon
Glass
Food coloring
Tennis ball, small rocks or coins
Instructions:
Mix the table salt into the water to make it taste salty.
Pour a couple of inches of this salt water into a large bowl or wash tub.
Place the clean drinking glass in the center of the bowl or wash tub.
Cover the bowl or wash tub with plastic wrap, making sure it’s tightly sealed.
Place the tennis balls, a small rock or a few coins in the middle of the plastic wrap, directly over the glass. This will form a small depression in the plastic without it touching the glass.
Place your water cycle outside, in sunlight, for the best results.
Watch this video to do the experiment: https://youtu.be/3h49i1iDNP4
Week 7 Lesson - Backyard BioBlitz
Everglades Backyard BioBlitz
Here is South Florida it is Spring Break. So to celebrate, we are urging you to get outdoors. This week you will learn about Everglades habitats by exploring outside!
Traditionally, a BioBlitz is an event where scientists, naturalists, and volunteers focus on identifying and cataloging as many species as possible in a specific time period. This helps scientists gather data of the biodiversity in a specific area.
You will conduct your own bioblitz using nature identification apps like iNaturalist or the Picture This App. Choose an outdoor space, and take 5 minutes to observe and record any plant or animal species you see.
Limited access to nature or no apps available? Draw the image, make observations, and conduct online research to identify the species. Use this sheet and identify the animal you see.
Documents for this lesson:
Everglades BioBlitz
Everglades Animals and Their Habitats Powerpoint
Spider Map
Plants of the Everglades ID cards
Major Animal Group Cards
Directions:
1. Convert your family into a team of scientists. The purpose of a bioblitz is to get an overall count of the plants, animals, fungi, and other living things that make their home in a certain area. Bio is a Greek word for life, and blitz is German for lightning. How many species do you think your family can identify in one afternoon? Arm yourselves with cameras and clipboards and venture outside. You never know what you’ll discover! In a 2012 community bioblitz at Forest Park in Portland, Oregon, participants discovered 247 species, including 66 different kinds of birds! 2. Before you go outside, define the area where you will look for living things. Will you search in your backyard, a field, or around your block? Even a small yard can be home to dozens of living things. In a bioblitz, the goal is to count as many species as possible. A dog is an example of one type of species, and a cat is another species, and an oak tree is a third example. 3. Print the Species Identification cards and attach them to a clipboard. Bring the Species Identification Cards and a field guide with you when you go outside. A field guide is a book with pictures that people use to help identify natural things. You can check one out at your library. In addition to using field guides to identify species, you can contact a local park for species lists and other resources about local living things. Or if you have a camera or a smartphone, use iNaturalist to collect data, identify your species, and map your bioblitz using the spider map. 4. Go outside and identify plants and animals. (And no, little brothers don’t count as animals!) Maybe you want to split your family into teams and compete to see who can find and identify the most species. Or work as a family toward a species identification goal. Don’t forget to draw and/or take pictures of what you find. Establish boundaries before your bioblitz. Kids should stay within eyesight of an adult. 5. Pool everyone’s findings. Make a map of your area using iNaturalist https://www.inaturalist.organd plot where you found each species. Later, you can do another bioblitz in the same area during a different season—will you find the same living things? 6. Discuss what you learned. For example, did you realize that humans aren’t the only living things in your area? Everything we do affects our many neighbors, big and small.
After you have done a bioblitz and observed and recorded your environment, separate the plants and the animals. Then take the animals and sort them into 5 major animal groups:
mammal
bird
fish
reptile
amphibian
arthropod
If you are participating from South Florida, try using this Powerpoint from Everglades Literacy Lesson 3.3 to review Everglades animals, plants, and habitats. Then try to classify which Everglades habitat these may be commonly found:
Hardwood hammock
Cypress swamp
Mangrove swamp
Pinelands
Sawgrass marsh.
Questions:
What are some of the characteristics we used to sort our Everglades animals into animal groups?
Does each habitat provide a home for all the animals or plants?
Do some animals or plants depend on more than one habitat?
Are all the different habitats necessary?
Week 8 Lesson - Watershed
Water is an important element necessary for the Everglades’ survival. The trouble is that the Everglades needs a certain amount of water at certain times of the year.
Too little or too much delivered at the wrong time could spell disaster for the animals living here in the Everglades.
The Everglades' ecosystem is a delicate balance that can easily be altered by just a few small changes.
Let's take a moment to talk about the water of the Everglades.
What does it do for the ecosystem? Where does it comes from?
Water soaks into the soil and rock beneath the land, helping plants grow while providing a drinking source for all the animals that live within the Everglades.
Without water, the marshes would dry up, the river of grass would cease to flow, plants would dry up, the fish would have no home, and the other animals would have no water to drink.
So how does this important element reach the Everglades?
Water arrives into the Everglades in two ways:
In a direct way
In an indirect way
The most direct way, is through rain. The Everglades gets a lot of its water from rainfall (somewhere around 60 inches per year on average).
When it starts raining over south Florida, it rains everywhere including on our largest lake, Lake Okeechobee. This is the start of the most indirect way for water to flow into the Everglades.
In Florida, water falls and collects in springs and lakes that start to flow into the Kissimmee River. The Kissimmee River flows south into Lake Okeechobee and joins the water already stored there. This is called our watershed.
Lake Okeechobee is shaped like a very large shallow bowl and when it collects too much water from rain, other lakes, and streams, it overflows its southern edge and water flows out creating the Everglades.
As the water flows through the Everglades to the bay, a lot of it starts to slowly soak into the limestone rock underground. Once it soaks into the limestone, it gets stored in underground caves called aquifers. Aquifers are Florida’s freshwater source, so when you get a glass of water from your sink, the water coming out of the faucet is coming from these aquifers. The Biscayne Aquifer, specifically, is the principal source of drinking water
The Geology and Hydrology of the Everglades
The geology and hydrology of the Everglades are the keys to understanding its ecosystems and their importance to south Florida.

The Formation of South Florida and Its Aquifers
The peninsula of Florida is part of larger area of land, much of which is below sea level, known as the Florida Platform. The Florida Platform has been alternately exposed as dry land and submerged by shallow seas multiple times in its history.
The frequent submergence of the Florida Platform is responsible for the geologic makeup of south Florida, which played an important role in the formation of the Everglades.
The body of water that covered Florida during periods of submergence was a fairly shallow sea. This shallow water attracted marine life such as shellfish, corals, and fish. When these creatures died, their shells or skeletons would drift down to the seabed and eventually form limestone, a rock that is very important to the hydrology of Florida. When the water levels retreated, the limestone layers of south Florida were exposed and became dry land. Since limestone is permeable, or porous, it allowed water to seep through it and form aquifers, or areas beneath the ground that hold water.
South Florida receives a very high amount of rainfall (approximately 60 inches per year), and large amounts of fresh water from overflowing rivers and lakes seep into the aquifer through the limestone. However, not all water makes its way to the aquifers. Water seepage can be partially blocked by marl and peat, types of soils that are formed from decaying plant matter. Marl and peat built up over time in some areas of south Florida and seepage was slowed, resulting in standing water in some areas. The marl and peat in south Florida today play an important role in many Everglades habitats.
The ancient seas are also responsible for the shape of south Florida, which guides the movement of water through the Everglades. During the periods of submergence, the currents that flowed over the seabed would carry the bits of shell and skeleton to the outer edges of Florida, forming more limestone in these areas. The same currents would also erode the limestone rock that had already formed in other areas of the peninsula. As a result, south Florida is more bowl-shaped than flat – both the east and the west coasts of south Florida are slightly elevated. The elevated coasts slope downwards towards the middle of the state, creating a wide, shallow channel. This channel forces the Everglades’ waters to flow to the south and southwest.
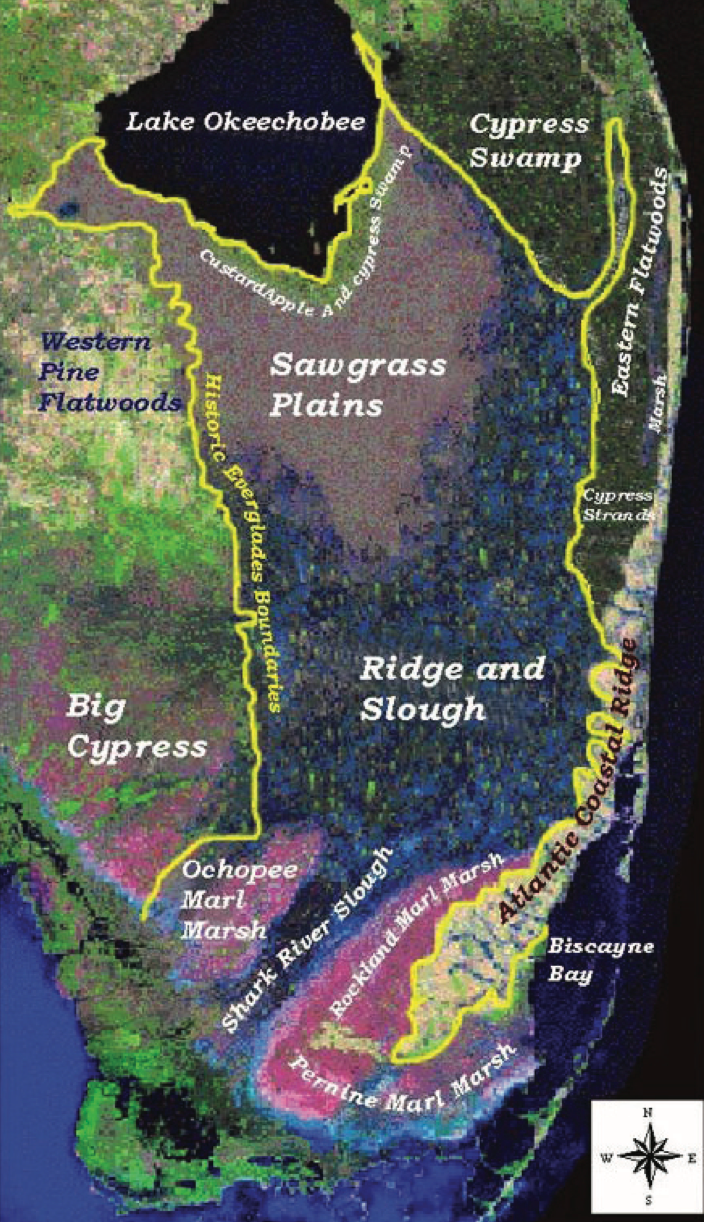
The Everglades Hydrology
The Everglades can be loosely described as a slow-moving river. This description was even more accurate in the past, before human altera- tions to the Everglades disrupted the water flow. The Everglades was formed by a combination of several things: large amounts of rainfall, a high water table combined with slow drainage, and the gentle slope of south Florida.
During the summer wet season, Lake Okeechobee and the other nearby rivers and lakes overflow each year. Not all of this flood water can be absorbed into the ground. Instead, it flows south and southwest, following the gentle slope of the ground. The slow-moving fresh water of the Everglades plays several important roles to this day. It forms a watershed that moves water across the land to Florida Bay. The watershed region covers a large portion of south Florida and provides habitats for many rare and unique plants and animals. The fresh water flow also maintains a low- saline marine habitat for many aquatic creatures in the estuaries that feed the Bay. This watershed also replen- ishes the groundwater in the aquifer, which then provides fresh water for local plants and animals during dry seasons. The aquifer system of south Florida is also important to the human residents by providing most of the fresh water used by humans in Broward and Dade Counties. Finally, the flow of the fresh water into the Gulf and the Florida Bay, both over land and through the limestone, stops the salty seawater from flowing into the lime- stone and contaminating the aquifer. The decrease of fresh water flowing through the Everglades could cause saltwater contamination of the Biscayne aquifer.
We have already learned about all the great habitats that our watershed creates. Let’s create a model of the watershed ourselves to see how the water naturally flowed in Florida. Then we will create a model of how water flows today.
The Heart of a Watershed – Student Instructions
Watch this video: https://youtu.be/Wii_vzLir3I
Materials Needed:
Post it notes
Toothpicks
A shallow pan
Playdough or clay
Map of the historic Everglades https://2feeae1a-1cd0-41cf-a9c1-cce331bd4e47.usrfiles.com/ugd/2feeae_8b69af3ba2e34c12a4e2551602ac6e58.pdf
Map of the altered Everglades https://2feeae1a-1cd0-41cf-a9c1-cce331bd4e47.usrfiles.com/ugd/2feeae_524d7fffbcb34cef94c125004b34eb78.pdf
Water Flow Map https://2feeae1a-1cd0-41cf-a9c1-cce331bd4e47.usrfiles.com/ugd/2feeae_97313a5fae3c48f287c92d07d4853b34.pdf
Part 1 - The Historic Everglades
Instructions:
Place the pan on a flat surface. Designate a “north” side and a “south” side.
Using toothpicks and post it tabs, make labels for each body of water.
Labels Needed:
Lake Kissimmee
Caloosahatchee River
Lake Hicpochee
“River of Grass”
Kissimmee River
St. Lucie River
Lake Okeechobee
Florida Bay
Take the clay and spread in the northern 2/3 of the pan in the shape of the Florida peninsula. Leave the south side empty to represent Florida Bay. Label Florida Bay.
In the center of the clay, make a 3”diameter indentation, about 1⁄2” deep to represent Lake Okeechobee. Label Lake Okeechobee.
Using the Map of The Historic Everglades as a guide, make channels in the clay to represent the Kissimmee River and Lake Kissimmee, as well as the Caloosahatchee River, and St. Lucie River. Notice how the historical Caloosahatchee River barely connects with Lake Okeechobee. You can even use different colors of clay to represent each of these features in your model. Make sure the Kissimmee River meanders as it does in the diagram.
Put toothpick labels in the model to designate locations.
Slightly lift the north end of the pan and pour water into Lake Kissimmee and check to see if it flows into Lake Okeechobee. The lake should overflow at its southern end. Keep pouring water until water flows into Florida Bay.
Questions:
How long do you think it would actually take for water to flow from Lake Okeechobee down to Florida Bay?
What is the advantage of having a slow, steady flow of water would be to the ecosystems and animals that lived in them?
Part 2 - The Altered Everglades
Instructions:
Alter your clay model to reflect the changes made to the KOE watershed.
Using toothpicks and post it tabs, make labels for all areas listed below
Using the Map of The Altered Everglades as a guide, make channels in the clay to represent the present day channelized Kissimmee River and Lake Kissimmee, as well as the Caloosahatchee River, and St. Lucie River. Notice the altered shape of the Kissimmee River is a straight channel, and the Caloosahatchee River and the St. Lucie River are now connected with Lake Okeechobee and are wider and deeper.
Put toothpick labels in the model to designate locations.
Labels Needed:
Lake Kissimmee
Lake Okeechobee
St. Lucie River
ARM/Loxahatchee NWR
Big Cypress National Preserve
Everglades National Park
Kissimmee River
Caloosahatchee River
Everglades Agricultural Areas
Water Conservation Areas
Tamiami Trail
Florida Bay
Lake Kissimmee
Slightly lift the north end of the pan and pour water into the Kissimmee River. As water flows into Lake Okeechobee and then through the Caloosahatchee and St. Lucie River, note how much of the water makes it to Florida Bay.
Questions:
How do the alterations to the Everglades affect the water flow to Florida Bay and to the east and west coasts of southern Florida?
Why were these changes made?
What are the advantages and disadvantages to the altered systems? Name two of each.
Week 9 Lesson - Animals in the Everglades
Within the Greater Everglades system is a collection of numerous
habitat types. A habitat is a home for plants and/or animals that provides
food, water, shelter, air, sunlight and space. This activity will develop the
students’ knowledge of the differences between the habitat type as well
as the different organisms that live in each one. The formation of the
limestone foundation of the Everglades determines where a certain
habitat is found. Therefore, pockets and islands of the different habitats
are scattered throughout the Everglades. The water level and water
availability determine the vegetation of a particular habitat and this in turn
determines the wildlife found there. Some wildlife species live in only
one type of habitat, while others move from one habitat to another
depending on the availability of food, water, shelter, and space.
Five of the major habitat types found in the Everglades are: sawgrass
marshes, hardwood hammocks, pinelands, cypress swamps, and
mangrove swamps.
The sawgrass marsh and cypress swamp are both wet habitats, with
fresh water flowing through them primarily during the wet season. These
two habitats differ in that the sawgrass marsh is dominated by sawgrass
and other aquatic plants with no trees so it is open and sunny. The
cypress swamps are dominated by cypress trees that create a canopy
allowing only some sunlight to reach other aquatic plants that grow in the
swamp understory. Today much of this land that comprised these habitats
has been drained and cleared.
Hammock and pineland habitats are high and dry. Generally, hammocks
are considered relatively small tree islands. A hardwood hammock is a
dense stand of broad-leafed trees that grow on a natural rise of only a
few inches in elevation. In the cypress swamps and marshes, the
seasonal flow of water helps give these hammocks a distinct aerial
teardrop shape. Pinelands may be extensive and drier. Pinelands are
dominated by slash pines.
Mangroves are associated with brackish water. There are three main
types of mangroves: red, black and white. The term “mangrove” is used
to identify several species of salt-tolerant trees that thrive amidst the
harsh growing conditions of the coast. Mangrove habitat serves as a
valuable nursery for a variety of recreationally and commercially important marine species. During the dry months, wading birds congregate here to
feed and nest. And during the summer months, these mangrove forests
provide the first line of defense against the howling winds and storm
surge of hurricanes.
In all five habitats, you can find animals from all six major animal groups:
mammals, birds, fish, reptiles, amphibians, and arthropods.
Procedure:
Part One: Everglades Animals and Their Habitats
1. Today you will be learning about some of the fascinating animals that call the Everglades home. Make a set of Everglades animal cards. Sort the cards into different groups based on your observations. Download here: https://2feeae1a-1cd0-41cf-a9c1-cce331bd4e47.usrfiles.com/ugd/2feeae_92215eb217594db19221e0e568fa0e14.pdf
2. Explain how you grouped their cards.
3. Now we will learn more about these Everglades animals, their characteristics, and where they live in the Everglades. Watch the attached powerpoint. Download here: https://2feeae1a-1cd0-41cf-a9c1-cce331bd4e47.usrfiles.com/ugd/2feeae_e25a020ea2cf44008058c78d1e6e288d.pdf
4. Describe from the photos the physical characteristics for each animal and identify which animal group each Everglades animal belongs to. Use the spider map to organize the animals that live in each habitat. The main idea for each spider map will be the habitat. There are 5 habitats. (Learn how to use a spider map here: https://www.storyboardthat.com/articles/e/spider-map)
5. Write the animal's name on spider leg for each habitat. For each animal, describe the animal’s physical characteristics. Based on those characteristics, which animal group does each animal belong to?
Part Two: Animal Classification
1. After completing the PowerPoint, grab your set of Major Animal Group ‘heading’ cards: Mammal, Bird, Fish, Reptile, Amphibian, and Arthropod and sort the Everglades animal cards under the proper animal group. https://2feeae1a-1cd0-41cf-a9c1-cce331bd4e47.usrfiles.com/ugd/2feeae_149c4ac78ac8408191187a1208c99502.pdf
2. Next, place the habitat cards (mangrove swamp, pinelands, sawgrass marsh, cypress swamp, and hardwood hammock) in the front of you.
3. Take each Everglades animal card and match then to which habitat that animal belongs.
Wrap-up: Answer these questions
• What are some of the characteristics you used to sort your
Everglades animals into animal groups?
• Does each habitat provide a home for all the animal groups?
• Do some animals depend on more than one habitat?
• Are all the different habitats necessary?
Vocabulary:
• Amphibian - any of a class of cold-blooded vertebrates that are able to live both on land and in the water.
• Arthropod – any invertebrate animal having jointed legs, a segmented body and an exoskeleton, including insects, spiders and crustaceans.
• Bird – any of a class or warm-blooded egg-laying vertebrates with a body covered with feathers and forelimbs modified as wings.
• Brackish water - Fresh water mixed with salt water
• Cold-blooded – animals whose body temperature will be the same as their surroundings.
• Cypress swamp - The most common and widespread of the Everglades freshwater swamps, dominated by cypress trees.
• Everglades - A natural region in southern Florida containing many different types of habitats, plants and animals.
• Fish – any of a class of cold-blooded vertebrates that live and breathe in water and typically have long, tapering scaly bodies and limbs developed as fins, and a vertical tail fin.
• Habitat - The natural environment of an animal or plant.
• Hardwood hammock - A dense group of broad leafed trees that grow on only a few inches in elevation.
• Invertebrate – any animal lacking a backbone or spinal column, such as an arthropod.
• Mammal – any of a class of warm-blooded vertebrates that include human beings and all other animals that nourish their young with milk produced by mammary glades and have skin usually with some hair.
• Mangrove swamp - a swamp in the Everglades that is dominated by mangrove trees. Mangrove trees are salt-tolerant trees that thrive amidst the harsh growing conditions.
• Pinelands - A forested area where pine trees and saw palmetto dominate.
• Reptile – any of a group of cold-blooded, air-breathing vertebrates (such as snakes, lizards, turtles and alligators) that usually lays eggs and has skin covered with scales or bony plates.
• Sawgrass marsh - A wetland where sawgrass, a plant that has spiny, serrated leaves, is the most dominant plant found.
• Vertebrate - any animal distinguished by the possession of a backbone or spinal column, including mammals, birds, reptiles, amphibians, and fishes.
• Warm-blooded – animals that can make their own body heat even when it is cold outside.
STEAM & The Everglades: Build your own Alligator

To make an alligator you need cardboard, brads, some type of adhesive, and some way to poke holes through your cardboard.
We used cereal boxes, specifically a couple of 17oz boxes of Honey Nut Cheerios. They measure just over 7.5 inches wide and 11.5 inches tall. If you have a box that same size (or bigger) you can use the printable template I’ve designed to make construction really simple.
Start by opening up your cereal box along the top and bottom, then find the seam along one side and open that up as well. Cut it apart as shown below until you have two pieces that each measure approximately 7.5 x 11.5 inches (a nice pair of scissors works just fine). Each piece is enough for one set of monster jaws, so you can make 2 sets from each cereal box. I did this step before I gathered the kids together.

Next you’ll want to draw lines lengthwise along your cardboard 1.25 inches apart. Note: most rulers are exactly 1.25 inches wide, making this step super easy. Then just cut along those lines until you have 6 long strips. Fold each strip in half, with the colored side on the inside. Use a glue dot or dab of glue gun at the end to keep the strips from unfolding.
At this point, you’ll have 6 double-weight cardboard strips, and you need to poke 3 holes in each one. Click here to download and print out my template to make this really easy.

Cut out a template, put it on top of a cardboard strip, and poke holes as marked. We placed a mousepad under the cardboard, then used a thumbtack to poke the holes. Once the hole is poked through, wiggle the thumbtack around to enlarge the hole a little.
Now you’ll want to grab your brads and get ready to start putting the cardboard together. I used mini brads I had left over from my scrapbooking days and they worked just fine – they were small enough to fit through the holes really easily. If you use larger brads (from the office supply section), you may need to make larger holes.

Start putting the jaws together following the photos below. The pink dot(s) in each photo show where a brad goes for that step.
Finally, cut teeth from the leftover cereal box scraps and attach them to the ends of your structure using glue dots, glue stick, etc. Then get snapping!
Week 10 Lesson - Airboats
Have you ever been on an airboat before? Have you ever wondered how scientists, researchers, and even students travel into the heart of the Everglades to study its plant and wildlife? The answer is airboats! An airboat is basically a boat propelled by a giant fan. Since the airboat’s propellers are placed above the water, the base of an airboat can be made completely flat. This allows the airboat to travel over places where normal boats cannot go, such as shallow waters, swamps, and sawgrass like in the Everglades. Airboats are a great way to experience natural ecosystems and the Everglades. Airboats are a popular form of transportation used by researchers and for recreation. Researchers in the Everglades use airboats to travel through rough terrain, and to sites that cannot be reached by other forms of transportation, including walking. Researchers monitor and assess water quality and ecological conditions by collecting data and samples at these sites. Scientists use this data to make management decisions to protect and restore the Everglades. Learn more about how airboats work with this video: https://youtu.be/afVulhauJT
In this lesson you will have an opportunity to experience an airboat ride in VR and/or build you own mini airboat at home. You will need a few items that you may not readily have at home.
Materials:
· Carboard VR or other VR Viewing Device
9v battery holder with connection wires, small motor, motor holder set
9v battery
Large piece of cardboard
Permanent marker
Ruler
Duct tape
Electrical tape
Hot glue gun
Toilet paper roll
In this lesson, you will learn how an airboat is made, and will learn how you can build one at home. You will learn about the engineering process as a way to plan, design, and improve your airboat prototypes. You will watch a video of how to build an airboat at home using some recycled materials, and will observe how the engineering process was used to design and improve the airboat. Plus, grab your VR viewer and watch a great video of a ride through the Everglades.
Newton’s Laws of Motion help us to understand how airboats move. Newton’s 1st Law says that an object at rest will remain at rest unless acted on by an unbalanced force. When dropped into the water, the airboat does not move on its own (unless it is windy). It needs the force of the propellers to move around. After the propellers have been turned on and the airboat has started moving, it will keep moving until it hits a wall, or something gets in its way (an unbalanced force).
Engineers start by having a good idea about what they want to accomplish. They ask critical questions about what they want to create, whether it is a skyscraper, an amusement park ride, a bicycle, or a smartphone. They ask questions like: What is the problem to solve? What do we want to design? Who is it for? What do we want to accomplish? What are the project requirements? What are the limitations? What is our goal? Use the space provided below for your engineering process or write it in a science journal.
In order to design and create your own airboat, it’s important to follow the steps of the engineering process.
Step 1: Define the Need and Constraints: Ask questions and research information about your airboat. What do you already know? What are the constraints?________________________________________________________________________ __________________________________________________________________________________________________________________________________________________________________________
Step 2: Research the Problem: Brainstorm ideas and solutions. Choose the best idea to create a prototype. _______________________________________________________________________________________________________________________________________________________________________________________________________________________________________________________________
Step 3: Plan a Possible Solution: Gather all the materials you need to create your prototype. Plan each step you will take to create your prototype. You can make a list or draw your design. _______________________________________________________________________________________________________________________________________________________________________________________________________________________________________________________________
Step 4: Create a Solution: Follow your plan and create your prototype. __________________________________________________________________________________________________________________________________________________________________________
Step 5: Test your Prototype: Test your prototype. Does it work? Are there any problems? __________________________________________________________________________________________________________________________________________________________________________
Step 6: Improve: Think about changes you can make to improve your prototype. Re-test your prototype and record why it worked better. _______________________________________________________________________________________________________________________________________________________________________________________________________________________________________________________________
The Engineering Process:
After using the engineering process to design/test an airboat, follow along with this video and student procedures of how you can build an airboat at home, and observe how the engineering process was used to test and improve the airboat.
Build an Airboat at Home STEM Activity: https://youtu.be/ejxmJot7U44
Procedures:
Use the video provided as a reference for each step when building your airboat. Build an Airboat at Home STEM Activity: https://youtu.be/ejxmJot7U44
Start by gathering your materials and drawing out the base of the airboat. On the large piece of cardboard, use a ruler to measure 20 cm wide and 30 cm long and use the permanent marker to draw the lines. Then measure 48 cm long from the middle of the base (10 cm) and draw along the lines. At the top of the 48 cm line, measure 8 cm in the center. From the top of each 30 cm line, measure 19 cm to the end of the 8 cm. This will be the base of your airboat.
On the same piece of cardboard, measure 16 cm across for the propeller. Use the permanent marker to draw the shape of the propeller with a narrow section in the middle, and a large fan on each side.
Carefully use scissors, or a box cutter, to cut out the shape of your airboat and the propeller.
With your 9v battery holder and the motor, you will need to create a closed circuit in order to turn the motor on. Make sure your battery is inside the motor, and make sure the switch is turned off. Create a small hole in the middle of your propeller, and push the propeller onto the motor. Connect the red wire from the motor to the red wire from the battery pack, and connect the black wire from the motor to the black wire from the battery pack. This will create a closed circuit and you will be able to turn on the motor. Test your fan to see which way the air is flowing. If it is not flowing outward, you may need to switch your wires and connect black to red, and red to black. Use electrical tape to secure the wires.
Since you will be testing the airboat in water, you will want to make sure that your boat is waterproof. Use duct tape to cover your cardboard base and cardboard propeller.
Next you will want to tilt up the narrow section of your airboat, this will help it to glide on the water.
Now it’s time to place the motor onto the airboat. You will need to place the propeller high enough so that the blades will not hit the base of the airboat. You can use a toilet paper roll or something similar. Using spare pieces of cardboard, cut out squares to glue to the top and bottom of the toilet paper roll. Then with the hot glue gun, carefully glue the toilet paper holder onto the base of the airboat.
Next place the motor into the motor holder and glue the motor holder to the top of the toilet paper holder. Make sure that your propeller does not touch the airboat. Tape the wires to the toilet paper holder and tape the battery holder to the airboat.
Use extra cardboard to glue on seats, or decorate your airboat however you would like.
It’s time to test your airboat! Before testing, write down some predictions in your science journal about what you think is going to happen. _______________________________________________________________________________________ ______________________________________________________________________________________________________________________________________________________________________________
Assessment Questions:
What worked? What didn’t work? What can you do to make your airboat better? ________________________________________________________________________________________________________________________________________________________________________________________________________________________________________________
The video tested 2 different types of cardboard propellers. They both worked, but after getting wet they didn’t work as well. What might be a solution to this problem? ________________________________________________________________________________________________________________________________________________________________________________________________________________________________________________
Did your predictions come true about your airboat? Why or why not? ________________________________________________________________________________________________________________________________________________________________
After re-testing your airboat with your improvements, did it work better? If it did, what made it work better this time? ________________________________________________________________________________________________________________________________________________________________________________________________________________________________________________
Take it a step further!
Try adding different weights to your airboat.
Test it against the wind to see if it still works.
Try using your airboat in a shallow marshy area, like the Everglades.
Waterproof your airboat so you can use it again and again.
Build you cardboard VR goggles and explore the Everglades with this VR video: https://youtu.be/WLXIEwuDdSM
·Email us a video of your airboat and mailing address for a special gift from Surf Skate Science
Week 11 Lesson - Hidden Wild
In Florida, water ties everything together. From our lakes to the everglades habitats to the ocean, if one system become endangers it effects everything.
Did you know that Everglades alone as over 30,000 acres of preserved wilderness. Today you will follow three students – Noah, Kiana, and Kourtez - on an expedition with hiking, biking, kayaking, and camping through Palm Beach County’s eco sights. Along with the students, see where you can enjoy fresh air, wildland vistas, and see things you didn’t know were in The Palm Beaches.
WATCH NOW
Your homework this week is to get out an discover! The students saw so many amazing things on their adventure! We want to see what you can discover. Grab a smart phone or a camera and head out on your own adventure. Even if you are just in your backyard, you can experience the beauty of our local birds, butterflies, vegetation and more. Or take your photo journey to a local park or beach. Send us what you discovered! This week EVERYONE who sends us their photos to info@surfskatescience.com will get a special Everglades Foundation prize by mail.
We cannot take this beauty for granted. There is only a small portion of Florida’s natural wild left intact. And the ecosystems that remain depend on each other to be healthy. It is one thing to hear about these amazing parts of Florida from us but a completely different thing to experience them for yourself.
Week 12 Lesson - Protecting our neighbors
This week we will get to know a little more about our neighbors that live in the Everglades and see how people are working to rescue those who are in danger.
7 Bizarre Animals in our Backyard of the Everglades
By Dr. Ruscena Wiederholt
Quantitative Ecologist

Are you uninterested in the mysterious power of the Florida panther, or the timeless beauty of a soaring great egret? Seeking more unusual creatures in the Everglades? Look no further, the diverse ecosystem contains dozens of imperiled species, numerous invasive species, and a few outlandish animals. Read below for some fun facts about unusual Everglades critters.
Six-Spotted Fishing Spider
These large spiders are aptly named after the Greek god of the sea, Triton, through their scientific name, Dolomedes triton. Instead of using spiderwebs to capture prey, they actually hunt or “fish” on the water. These specialized spiders rest their legs on the water’s surface to sense ripples from prey. Once detected, they run across the water to kill their prey, including fish, frogs, insects, and tadpoles. With the aid of venom, prey up to five times their body size is fair game! While spiders get a bad rap as menacing, creepy crawlies, most are harmless and often eat insects we consider pests. In fact, they’re not insects at all, belonging to a different taxon including scorpions, ticks, and mites.

Lined Seahorse
Belonging to a taxon meaning “horse” and “sea monster” in ancient Greek, seahorses are, in fact, delightful little fish. One of three seahorse species in the coastal waters of South Florida, lined seahorses live in coral, mangrove, and seagrass habitat. Good fathers, male seahorses actually care for the eggs. Females deposit eggs into the male’s brood pouch, where he fertilizes and carries them until they hatch. Unfortunately, these charming fish are listed as vulnerable by the International Union for Conservation of Nature. Coastal development, marine pollution, trade for aquariums and traditional medicine, and catch from fisheries are the main threats to this species.

Fish Crow Hiding in plain sight, this species is nearly indistinguishable from the familiar American crow. The best way to tell them apart is through their calls; the fish crow sounds more nasal, while the American crow has a harsh caw. Fish crows inhabit beaches, marshes, estuaries, lakes, rivers, agricultural fields, and urban and suburban areas. Found in the eastern and southeastern U.S., their range has expanded northwards and inland in recent decades. Crows belong to the family of corvids, noted for their remarkable levels of intelligence. Corvids use and construct tools, can recognize individual humans by their faces, and themselves in a mirror.

North American River Otter These lively mammals are comfortable both on land and in the water. Preferring freshwater habitats, they’re found throughout Florida, excluding the Keys. A top predator, they build their burrows on the banks of rivers, creeks, lakes, ponds, and swamps. Renowned for their playfulness, they wrestle and chase each other, slide down riverbanks, play hide and seek, and even juggle objects in their paws. These activities are thought to improve their hunting skills and social bonding. The primary threats to these diverting mammals are habitat loss and pollution.

Greater Siren
Massive reptiles are an everyday thing in Florida, but gargantuan amphibians, too? Yes, Florida houses the greater siren, one of the largest salamanders in North America, reaching nearly a meter in length. This monster of a salamander has both gills and lungs, allowing them to breathe underwater and in the air. They inhabit wetlands, and if conditions dry out, they burrow into the mud and aestivate. Impressively, this period of dormancy can last for years. As a predator, they eat primarily invertebrates, including insects, snails, crayfish, and spiders. In turn, they’re preyed upon by a variety of top predators, including American alligators, large wading birds, and snakes.

Spectacled Caiman
Florida has the dubious distinction of having the largest number of established, non-native reptiles and amphibians in the world. One good example is the spectacled caiman, which arrived in Florida via the pet trade in the 1950s. Originally found from southern Mexico to northern Argentina, their sensitivity to cold temperatures prevents them from expanding northwards in the U.S. Spectacled caimans are a problem, since they prey on native birds, small mammals, fish, and reptiles, and also compete with American alligators.

Nine-banded Armadillo
Armadillo means “armored” in Spanish, since these little mammals are covered in segmented bony plates. Despite this layer of protection, they still fall prey to animals like panthers, alligators, black bears, or large raptors. Contrary to popular belief, they can’t roll into a ball when threatened, although other species of armadillos can. Originally found south of the border, by the late 1800s, they had expanded their range into the U.S. Humans then introduced them to Florida as early as the 1920s. Forested or semi-open habitats are their preferred habitats, and they eat insects, invertebrates, and plants. Interestingly, females always give birth to identical quadruplets, either all female or all male.

The Everglades Foundation’s mission is to restore and protect America’s Everglades. Restoration is the only measure that will increase the southerly flow of freshwater needed to stabilize the critical habitats that are home to many threatened, endangered and unusual species.
In today's lesson you will learn more about the efforts to save the Florida panther. Download the lesson here: https://a6845af9-5987-4f7a-b51d-1836b1631f23.usrfiles.com/ugd/2feeae_f3be6cf34e584217bbfe1e68a7fbac7f.pdf
Email us your worksheet at info@surfskatescience.comfor a chance to win an evergladeprize pack.
Week 13 Lesson - Why it all matters

This week several of our students will be embarking on a swamp tromp to ecperience the Everglades first hand. There are still a few spots left if you would like to join us. Thursday May 5, 2022 Swamp Tromp and Paddle REGISTER HERE
Did you know that The Everglades is unique? No other wetland system in the world is nourished primarily from the atmosphere.
Although sawgrass and sloughs are the enduring icons of the Ever- glades, other ecosystems are just as vital, but the borders marking them are subtle or nonexistent. Pinelands and tropical hardwood hammocks are located throughout the sloughs; the trees, rooted in soil mere inches above the peat, marl or water, support a variety of wildlife.
We've already learned that the Everglades includes freshwater marshes and swamps, rivers sloughs and springs, hardwood forests and hammocks, pine flatwoods and rock land, scrub, sandhills, prairies and savannas, mangroves and more.

When Congress passed a bill in 1947 to create Everglades National Park, it was the first time in history a park had been created solely for the preservation of animals and plants, and the environment that sustains them. The Big Cypress National Preserve was created in 1974 and was the first preserve in the U.S. National Park System. Its creation was a response to a diverse coalition of conservationists, scientists, traditional outdoors- men, Miccosukee and Seminole Indians, and dedicated individuals who became outraged by plans to construct an airport in the middle of “the swamp.” Anyone who has visited and enjoyed these beautiful natural areas can understand why their preservation is critical.
Since then the Everglades National Park was designated as:
An International Biosphere Reserve in 1976
A World Heritage Site in 1979
A Wetland of International Importance in 1987
A Specially Protected Area under the Cartagena Treaty in 2012
People have co-existed with the Everglades for thousands of years, but in the past 100 years humans have changed its natural landscape dramatically. Settlement of urban areas in southern Florida was facilitated by large drainage projects intended to create more land for development. The drainage was often implemented without understanding the processes that shape the Everglades or the value of services the ecosystem provides. In 1905, Florida began a concerted effort to drain the Everglades to make the land suitable for agriculture and development.
As the population grew, so did the need to provide flood control.
In 1948, the U.S. Congress authorized the Central and South Florida Project, which created one of the most effective water management systems in the world. Today, the project’s extensive network of man-made canals, levees and water control structures channel an average of 1.7 billion gallons (6.4 billion liters) of water daily from the Everglades into the Atlantic Ocean and Gulf of Mexico. But with development, drainage from the everglades has been cut in half. As the water receded, so did the natural habitat of wading birds, fish and animals. Vast wetlands, which provided refuge for migratory birds and nesting grounds for wading birds, have been impacted. At least 90% of the wading birds have been lost. Saltwater flowed farther into the marsh from the ocean, and pollution flowed in from neighboring farms and cities.
The Everglades is a national treasure just as extraordinary as the Grand Canyon, the Great Lakes, or the Redwood Forests. But, the good news is that a remark- able coalition of highly diverse and bipartisan interests has joined forces to make restoration possible. Florida is undertaking the largest environmental ecosystem restoration in the world to revive and protect this national treasure.
Continuing to learn about our unique ecosystem here in Florida is important for our future. So, if you are unable to join us in person, experience this Swamp Tromp virtually with us.
In today's video, you'll be exploring a Swamp Tromp trail at local park, Grassy Waters, to learn about the common air plants you can find in the swamp. Some of these can even be spotted along their Cypress Boardwalk.
What is a swamp tromp? It is a hike is on a rugged submerged trail that requires stepping over and ducking under vegetation and other obstacles. Water levels may be over knee-deep. This is the best way to see the unique and diverse ecosystem of the Florida Everglades.
Your homework this week: Create a drawing or piece of art showing your favorite things in the everglades. Snap a photo and email us at info@surfskatescience.com or tag us on social media at @SurfSkateScience and @EvergladesLiteracy
Week 14 Lesson - Becoming an advocate
What is an advocate? An advocate is someone who defends or maintains a cause. You may have heard of Marjory Stoneman Douglas. She was a journalist, author, women's suffrage activist, and conservationist.

She became involved in Everglades conservation in the 1920s when she joined the Everglades Tropical National Park Committee board, a group dedicated to making the Everglades a national park. In 1969, she founded Friends of the Everglades which still exists today.
You can also be an advocate. An advocate helps by being a voice for restoring the Everglades. Home to more than 80 endangers species of plants and animals, it is the source of drinking water for nearly half the state's population. It protects South Florida against saltwater intrusion caused by rising sea levels and mitigates damage from increasingly dangerous hurricanes. Its mangroves absorb and store carbon dioxide, creating one of the largest carbon sinks in the nation.
So what can I do? I am just a kid!
Tell our president and senate!
This is a federal project so sharing with our leaders how important YOU think the Everglades is, is VERY important.

Tell Your Elected Officials to Send the Water South!
The fight to restore America's Everglades has been long, but we are finally making good progress. But, there are efforts to undo this progress and we need YOU to speak up to your elected officials to keep the ball rolling in the right direction.
When you click on the link below, you will be letting your State Representative, State Senator, Congressman or Congresswoman, and both U.S. Senators know that you are an Everglades advocate and you expect your priorities to be their priorities. Click this link to sign a letter that will go to your elected officials: https://www.evergladestrust.org/evergreen_contact_elected_officials
Contact the Governor's Office
Call Governor Ron DeSantis and tell him you support his agenda. Best number for him is (850) 717-9337. Speak to a live person, if possible.
Visit the Everglades & tell others about it
Visit the Everglades, learn about it, experience it, and tell others about what you have learned. Pick up a good book about the Everglades and read it, such as Michael Grunwald’s, The Swamp: The Everglades, Florida, and the Politics of Paradise. The best way to see how amazing the Everglades is, is to explore them first hand! Many of you have done this during these lessons, but if you have not explored these amazing habitats yourself, make it a priority to do with your family!
If you love the Everglades and have a passion for it, consider learning more!
We need more scientists that will advocate and help restore this resource. Consider pursuing a career that will give back to this precious resource.
Meet Dr. Ruscena Wiederholt. Alligators impact other species in the Everglades and they are one of her favorite species. She is a Quantitative Ecologist. Check out this video to see what she does:
You can also learn with your family at this upcoming online event:

“The Everglades is a test. If we pass it, we may get to keep the planet.”
- Marjory Stoneman Douglas
Thank you so much for being part of our Everglades Explorer series. We would love to hear your feedback on this pilot program.
Email us at info@surfskatescience.com with your feedback and suggestions.
Plus, when you email us to tell us you completed the course we will mail you a packet and certificate from the Everglades Foundation for completing the program.


Comments